• Home
  • About
  • Blog
  • Blog Index
  • Blog History
  • Furniture Before & After
  • Rooms Before & After
  • Contact
  • Furniture For Sale
Menu

Designs Refined

1701 Craig Ave
Altadena, CA, 91001
818 429 8699

Your Custom Text Here

Designs Refined

  • Home
  • About
  • Blog
  • Blog Index
  • Blog History
  • Furniture Before & After
  • Rooms Before & After
  • Contact
  • Furniture For Sale
IMG_3220.JPG

Blog

The 515 Day Bathroom Remodel-Tile and Stone

May 9, 2022 Linda Hammond

Finally some pretty stuff.  The tile had been stored in the tub initially and now it was time for it to be applied to the walls, oh happy day.

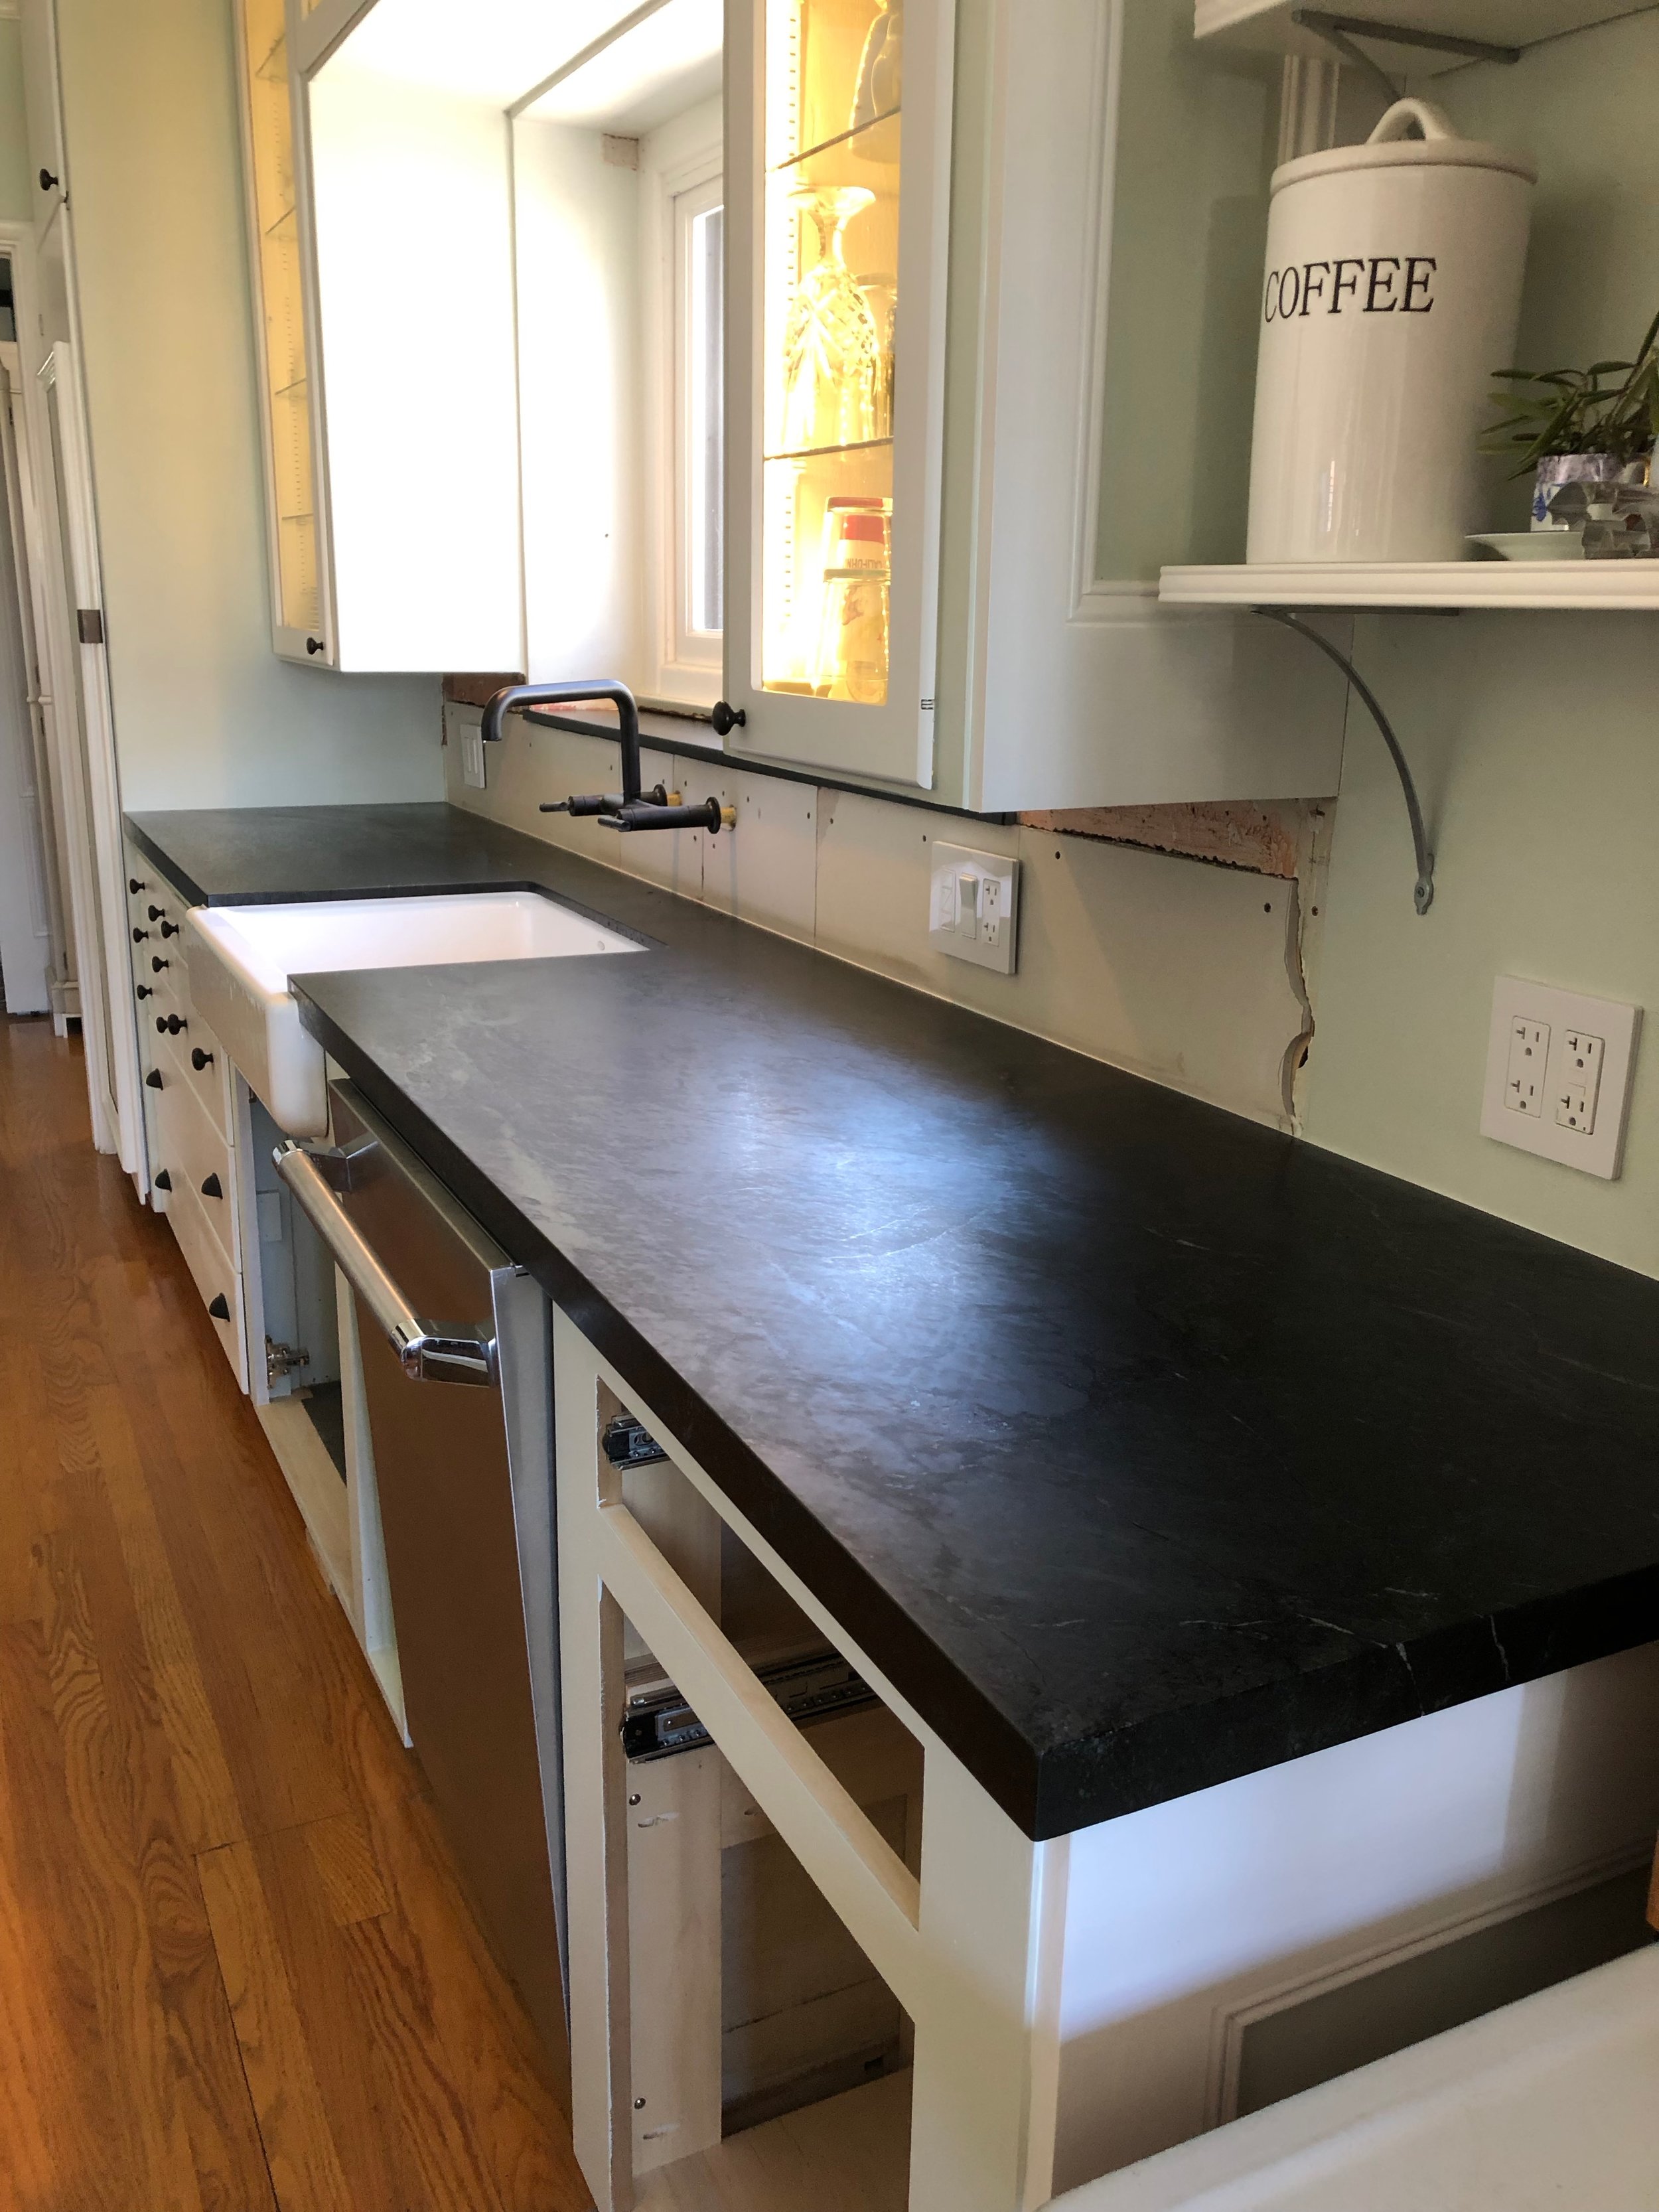
However, first there were again many measurements to be made, while the vanity was in place and with the help of son-in-law and a helpful neighbor friend the ninety pound trough sink could be set in place so the stone counter could be set.  Plumbing in the wall had been completed for the two faucets and we had a fully functioning sink again.  We were only without a sink in this bathroom for two days.

The stone fabricator had picked up the soapstone slab, which we had stored for a couple of years in the garage after the kitchen counters had been finished, to be cut to fit the sink opening.  Once the stone masons came and got the slab cut and returned to set and caulk it, we could plan for the tile.

Measurements from the surface of the stone, allowing for grout lines, began and the engineer put a ledger board around the walls to ensure that the tile lines would be consistent all the way around the two adjacent walls encompassing the tub.

We decided the wall that held the sink and two windows would be fully tiled since one of the windows was partially over the tub.  We had taken both the windows out so they could be restored to proper working order.  Which meant they had to be stripped of eighty plus years of paint and the lift systems had to be replaced to function again.  


Once the windows were restored, I was concerned about having a wood window frame inside the shower area, which previously had only been a tub.  I came up with the idea that we could frame out the windows with marble chair rail and a marble window sill.  The niches were all marble and framed out similarly, so why not add the chair rail to the windows.

Naturally, this addition had to be considered before the backer board was installed, so the tile walls would be flush to the chair rail. 

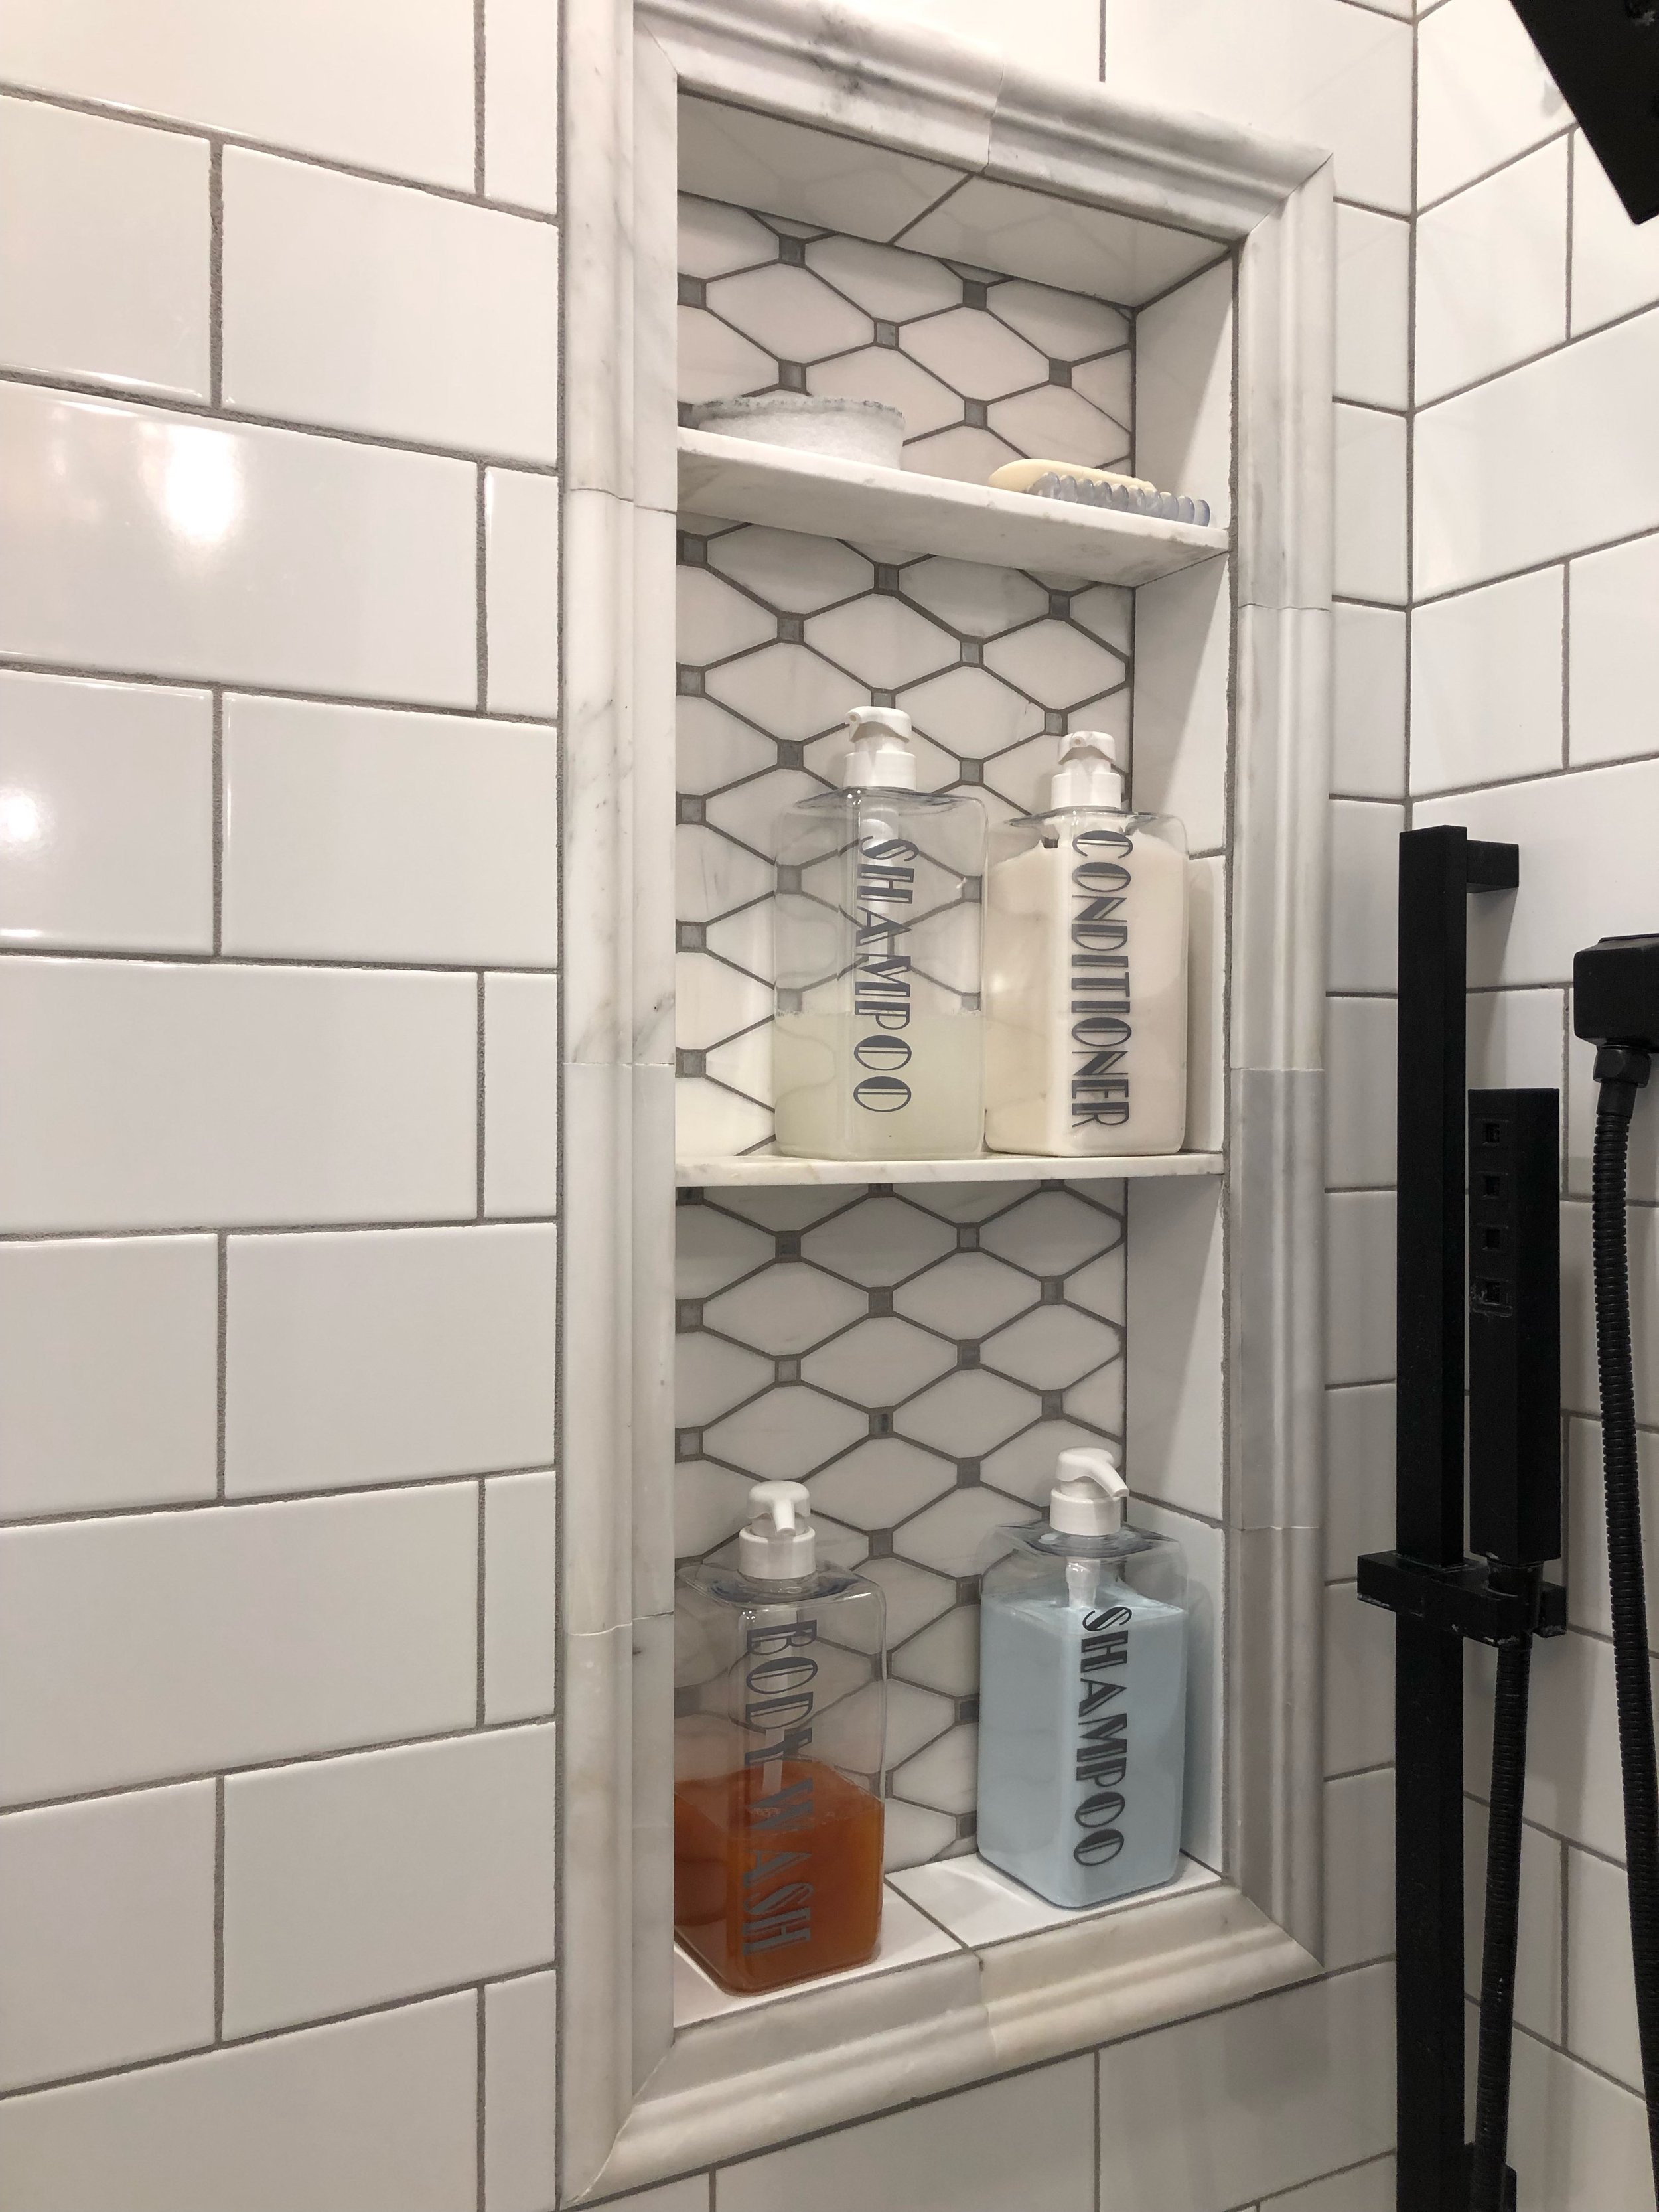
A word about the niches.  We had decided that since the tub and shower were in one place, we would need a niche for the tub as well as for the shower.  The engineer designed a vertical niche to accompany the bottles of shampoo, body wash, etc., and a horizontal niche for the occasional tub soak.  To complete the experience he added a teak shelf that could be placed across the tub to hold a cup of tea or wine, and the niche would be an ideal spot for a scented candle.

The stone for the niches was selected long ago.  I had found a beautiful marble rhomboid shaped tile, while it was a bit of a splurge, it was a relatively small area.  The chair rail framed out the niches as well as the windows.  However, the window framing was a late decision and we needed more. As luck would have it we found just enough to finish the project, as the chair rail was discontinued.


It turned out that the chair rail had to be epoxied to the walls, which turned out to be a multi-day project.  Now that the niches and windows were installed the tile on the walls could begin.  The engineer started from just above the tub at counter height and went up and onto the adjacent wall before finishing below the ledger board.

At this point, we were feeling like we could see the light at the end of the tunnel and we were just under a year into this project, and only had two walls finished.  Albeit those two walls were heavy with plumbing and electrical stuff, and all that tile.  Those two walls held three of the four essential  components of a full bathroom.

Next:  Preparing the toilet room and stenciling

In bathroom, interior design Tags Soapstone, subway tile, teak shelf, rhomboid marble tiles, bathroom, marble chair rail
Comment

Kitchen Complete

September 29, 2019 Linda Hammond
IMG_1882 copy.jpeg

Kitchen renovations are always about compromise.  We decided to keep somethings that were here when we took up residence, although they are not original to the 1938 design of the house.  While we made some big changes, none of the fixtures moved except the dishwasher.

IMG_1881 copy.jpeg

When I last wrote, it was July and my handy husband was removing the old tile countertop and backsplash set in an inch of concrete and a stiff wire mesh.  It. Was. A. Mess.  Not to mention time consuming and hard on his shoulders.  You might think that once the tile was up the countertops could go down.  But, in the real world it does not work quite that easily.

IMG_1880 2.jpeg

There is electrical work to do to bring the formerly remodeled kitchen from, I’m guessing, the 1960s into the 21st century.  New electrical outlets, some with electronic charging capabilities.  Walls were opened for additional outlets to supply a coffee maker and coffee grinder, along with a spare or two for good measure.  All appliances get their own circuit which eliminates breakers kicking off in the middle of a task.

IMG_1711.jpeg

Once the electrical was compete, and that means pushing and pulling what seemed like thousands of wires through tiny openings, above ground and under the house, my husband moved onto building a new cabinet to contain the trash and recycling.  This cabinet would serve as a base to an additional two feet of new counter space.  My very handy husband built the cabinet to match the existing cabinetry that we chose to keep; while he was in the carpentry mood he made new doors for the cabinet under the sink as well.

IMG_1449 copy.jpeg

Next came the plumbing, new faucet and high loop for the dishwasher drain line, and moving the garbage disposal drain pipe, that changed position for the new sink.  All of the above work took us through August.  Someone asked how retirement was coming along.  We answered, working every day and weekends, just like before, but on a fixed income!  All true, but not as bleak as it sounds.  These are projects “we” like to do, keeping in mind who is doing most of the labor, I’m the idea person, with a side of clean up and help where needed part.  The hero in this story is the engineer!

IMG_1712 copy.jpeg

I was thrilled to have a new sink and faucet working before the countertop was set.  We purchased a soapstone slab and had a fabricator measure for us and get onto his schedule, while I painted the new cabinetry.  The slab was installed a week earlier than expected, but none too soon for us, we were ready.

IMG_1727 copy.jpeg

We did take a little time for celebrating birthday’s and our anniversary, before the tiling of the backsplash began.  Now it is finished and we are so pleased.  I love that I have my trusty Hoosier Cabinet dedicated to baking and cereal storage only, a place for the coffee maker and more counter space than this kitchen has every had.  A bonus, is that “we” extended the floor under the sink to be flush with the existing cabinetry, giving us about three more inches in depth.  With this my handy husband built a pull out shelf to contain the under sink necessities, now easily accessible.  

IMG_1729 copy.jpeg
IMG_1773 copy.jpeg

I think my husband is going to move to working on the Model A again, to give his brain something else to think about, and different muscles to get sore.

In interior design, Kitchen ideas Tags Soapstone, farm sink, concealed trash/recycling
Comment

Subscribe to Linda's Blog Page

Enter your email address:

Delivered by FeedBurner

Powered by Squarespace